Setup Guide
You're 5 minutes away from building GHL sub-accounts with your voice. Let's get you connected.
! What You'll Need
Have these four things ready before you start. Claude will ask for each one when you run setup_ghl_mcp.
Items 1 and 2 were sent to your email after purchase. Items 3 and 4 come from your GHL account — this guide shows you exactly where to find them.
1 Find Your License Key
Check the email you used at checkout. You should have received a welcome email from Elite DCS with your license key. It looks like this:
xxxxxxxx-xxxx-xxxx-xxxx-xxxxxxxxxxxx
Copy this key — you'll paste it into Claude in Step 4. Your license activates on up to 3 machines (desktop, laptop, work computer). Reinstalling on the same machine doesn't count.
2 Get Your GHL API Key
Switch into the correct sub-account first. API keys are scoped to individual sub-accounts — a key from Sub-Account A won't work with Sub-Account B.
(Agency users: you can create an agency-level key instead. Pass your Company ID to setup_ghl_mcp when prompted.)
Navigate to:
Configure your integration:
- Name it
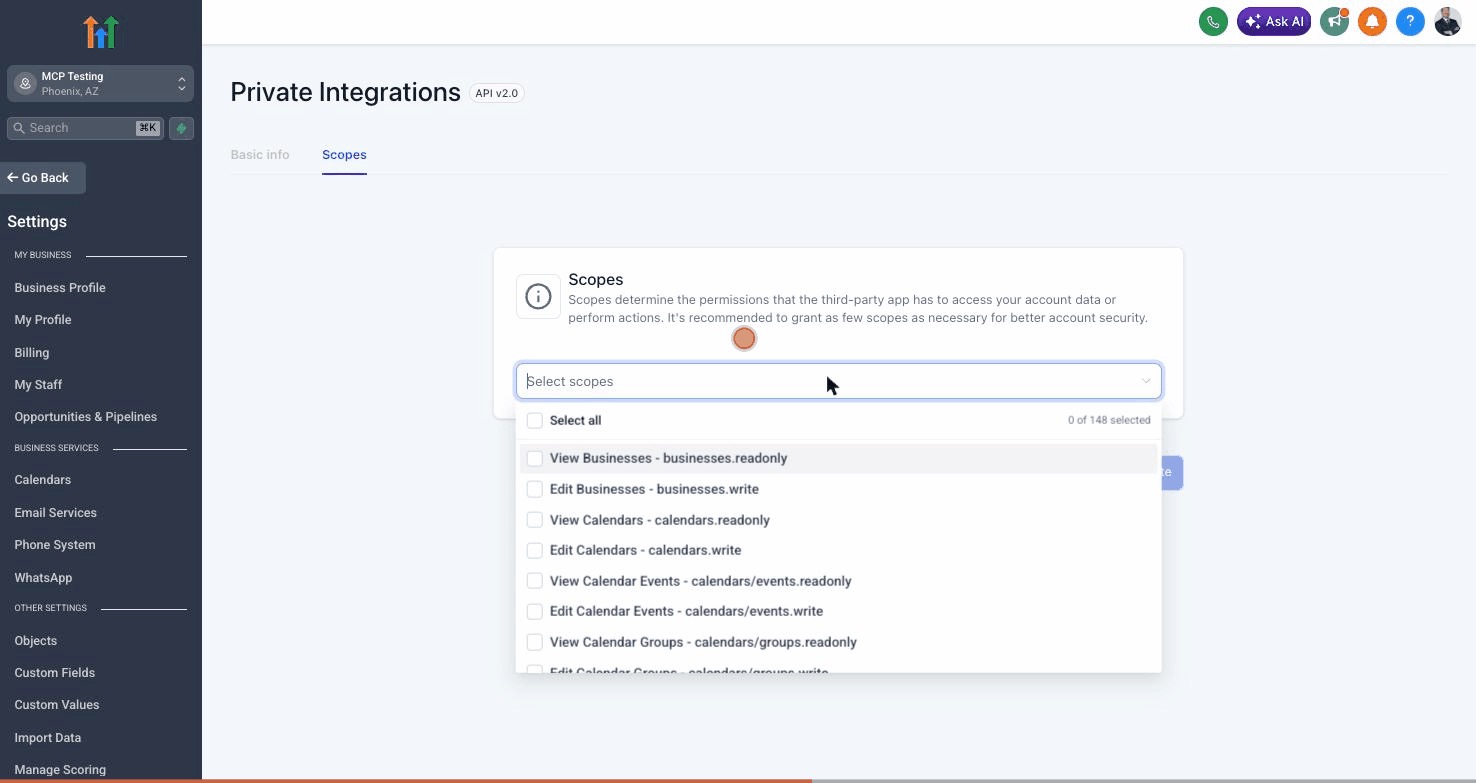
Claude MCP(or any name you'll recognize) and click Next. - On the Scopes step, click the scopes dropdown — a list appears showing 148 individual permission checkboxes. Don't check them one by one. Click the "Select all" checkbox at the very top of the dropdown to enable every scope in one click. Then click outside the dropdown to close it.
- Click Create. GHL will then show a "Security Risk" confirmation modal warning you about creating an integration with sensitive scopes — this is expected and normal. GHL is telling you the integration needs broad access. Click Confirm.
- Immediately copy the API Key when it appears and paste it into a notes app right now — this is your only chance.
Walk-through of the full PIT creation flow:
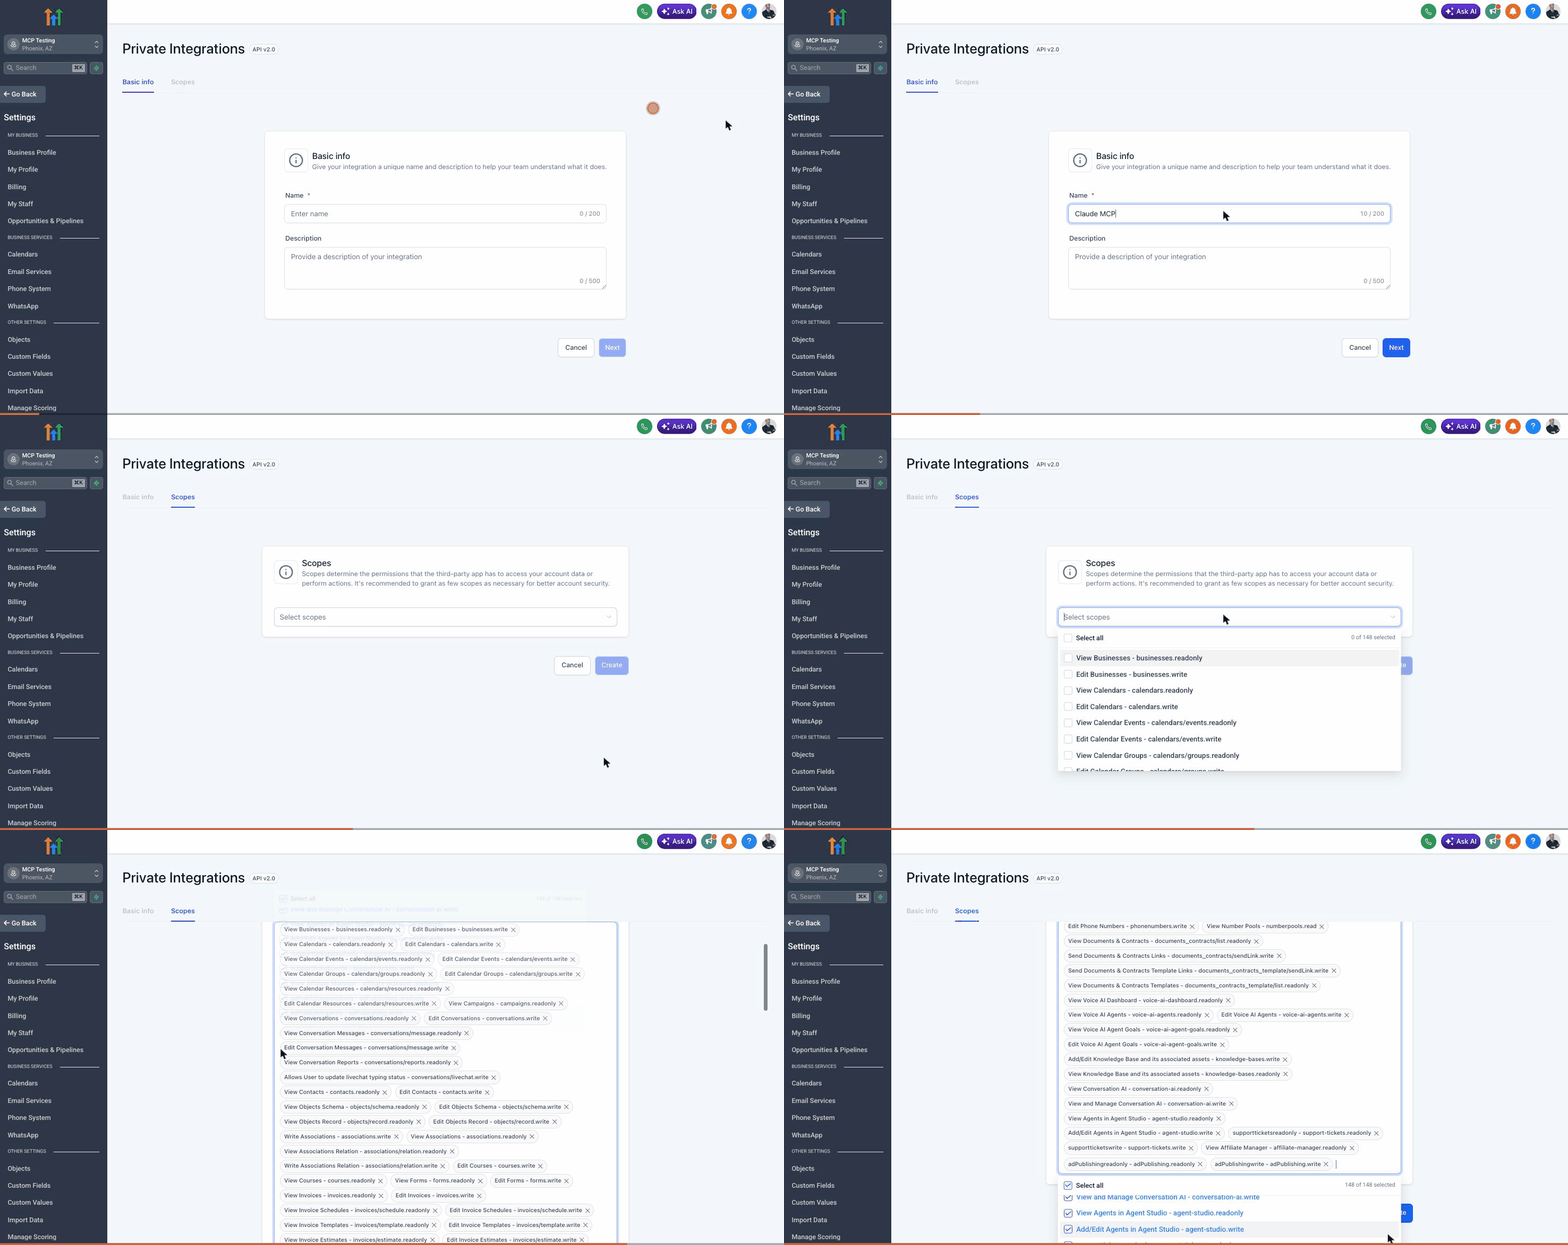
The key visual: where the "Select all" toggle lives. Most people miss it because it's tucked at the top of the dropdown — not on the main form.
3 Find Your Location ID
Your Location ID (sub-account ID) is in the URL when you're inside a sub-account. Look at your browser's address bar:
https://app.gohighlevel.com/v2/location/YOUR_LOCATION_ID/dashboard
It's the long string between /location/ and /dashboard. It looks something like: abc123DEFghi456
This is what it looks like in your browser's address bar — the highlighted portion is your Location ID:
https://app.gohighlevel.com/v2/location/JrV2p35O3hY2wqhr2c0T/dashboard
Tip: triple-click the URL in your browser to select the whole thing, then look for the highlighted portion. Or just click in the URL bar and use your arrow keys to select between /location/ and /dashboard.
Copy this value. You'll paste it into Claude in Step 4.
4 Connect GHL Command to Claude
You need to tell Claude where to find GHL Command. There are two paths depending on which Claude you use. Pick one.
- Open the Claude Desktop App.
- Click Claude menu (top-left) → Settings... → Developer tab → Edit Config. The config file opens in your default text editor.
- Paste this block (or merge into your existing
mcpServersif you have other MCP servers configured):
{
  "mcpServers": {
    "ghl": {
      "command": "npx",
      "args": ["-y", "@elitedcs/ghl-mcp@latest"]
    }
  }
}
- Save the file.
- Quit Claude completely (Cmd+Q on Mac) and reopen it.
Open Claude Code and paste this single line:
! claude mcp add --scope user -t stdio ghl -- npx -y @elitedcs/ghl-mcp@latest
The ! prefix tells Claude Code to run the command directly. Then restart Claude Code (Ctrl+C then re-open).
That's the install. No git, no Node.js prereqs, no terminal commands you have to memorize. npx handles fetching the latest version automatically each time Claude starts.
5 Activate Your License
After you restart Claude, it has GHL Command loaded but locked. Activate it by typing this prompt (replace the four placeholders with your real values from Steps 1–3):
Run setup_ghl_mcp to activate GHL Command:
  email: YOUR_PURCHASE_EMAIL
  license_key: YOUR_LICENSE_KEY
  ghl_api_key: YOUR_GHL_API_KEY
  ghl_location_id: YOUR_LOCATION_ID
Claude will ask permission to call setup_ghl_mcp — approve it. The tool validates your license against our server, verifies your GHL credentials work, and writes them to your machine. You'll see "Setup complete!" with your activation count (e.g., 1/3).
Quit Claude completely and reopen it once more. When it comes back, 163 tools are unlocked. Try:
"List my GHL contacts"
If you see your contacts, you're done.
6 Enable Workflow Builder (Optional)
49 of GHL Command's tools use GHL's internal API and require Firebase authentication: the workflow builder, funnel/page builder, form builder, pipeline builder, workflow cloner, smart lists, reputation, email campaigns, memberships, and the pre-deploy validator. Skip this if you don't need to create or edit workflows / funnels / forms / pipelines yet — the other 163 tools work without it. You can always add this later.
v3.25.0 ships a one-paste flow that replaces the old three-separate-IndexedDB-lookups process. About 60 seconds end to end.
Step 6a: In Claude, ask:
Run auto_capture_firebase_script
Claude hands back a short JavaScript snippet plus a copy of these instructions.
Step 6b: Open GoHighLevel in Chrome and make sure you're logged in. Press Cmd + Option + I (Mac) or F12 (Windows). In the panel that opens, click the Console tab (the one with the > prompt).
Step 6c: Paste the script Claude gave you into the Console and press Enter. You'll see a green message and a JSON object — the script already copied the JSON to your clipboard automatically.
Step 6d: Back in Claude, paste:
Run enable_workflow_builder:
  firebase_paste: PASTE_THE_JSON_FROM_STEP_6C_HERE
Approve the tool call. Quit Claude (Cmd+Q) and reopen. All 212 tools are now live.
Shortcut: if you haven't done step 5 yet, you can do the Firebase capture at the same time. Run auto_capture_firebase_script first, then include firebase_paste: <your JSON> as a sixth field on your setup_ghl_mcp call. One restart, all 212 tools live.
Standalone Firebase walkthrough with the same script (and a copy button): elitedcs.com/ghl-mcp-firebase
Manual capture (if the console script doesn't work in your browser)
Some locked-down browsers block navigator.clipboard.writeText. Manual fallback:
- In DevTools, click Application tab, expand IndexedDB.
- Click through:
firebaseLocalStorageDb→firebaseLocalStorage. - Find the row whose Key starts with
firebase:authUser:. - Firebase API key — in the row's Value, find the
apiKeyfield (starts withAIza). - User ID — in the same Value, find
uid. - Refresh token — in the same Value, expand
stsTokenManager, copyrefreshToken. - Pass them as
ghl_user_id,ghl_firebase_api_key,ghl_firebase_refresh_tokentoenable_workflow_builderinstead offirebase_paste.
health_check in Claude to see "Firebase auth: FAIL"), re-run auto_capture_firebase_script and enable_workflow_builder with the fresh paste.
? Need Help?
If anything goes wrong during setup, here are the most common fixes:
- "License validation failed" or "License key not found" — Make sure you're using the exact email from checkout and the license key from your welcome email. Both must match what we have on file. Check your spam folder if you don't see the welcome email.
- "GHL API key is invalid (401)" — The key can only be copied once when you create it. If you lost it, delete the integration in GHL and create a new one.
- "GHL API key doesn't have access to this Location ID" — You created the key in a different sub-account than the Location ID you entered. Switch sub-accounts in GHL and create a new key inside the right one.
- "Install limit reached" — Your license is activated on its 3-machine limit. Email support@cliniclaunchlab.com with your purchase email and we'll reset it.
- "Only setup_ghl_mcp is available" after restart — Setup didn't write credentials successfully. Re-run
setup_ghl_mcpwith all four required fields. - Something else? — Email support@cliniclaunchlab.com with a screenshot and I'll help you personally.
i What GHL Command stores
Everything stays on your computer. The MCP server runs locally inside Claude on your machine — we never see your GHL data, we never see your tokens.
- Your license key, GHL Private Integration key, Location ID, and Firebase auth (if configured) live in a single file on your computer:
~/Library/Application Support/elitedcs-ghl-mcp/credentials.jsonon Mac,%APPDATA%\elitedcs-ghl-mcp\credentials.jsonon Windows. File permissions are restricted to your user account (mode 0600 on Unix). - The MCP talks directly to GoHighLevel from your machine using your credentials. Our server (
elitedcs.com) is only contacted at Claude startup to verify your license is still active. - We never store or proxy any of your GHL data — contacts, conversations, opportunities, workflows, none of it.
- We never see the contents of your Claude conversations. Claude is talking to the local MCP server, not to us.
x How to revoke / uninstall
All three steps together take about 30 seconds.
- Revoke the GHL Private Integration key. In GHL:
Settings → Integrations → Private Integrations, find your "Claude MCP" integration, click the three-dot menu, choose Delete. The key is revoked immediately on GHL's side — even if our local file still has it, GHL will reject every call. - Delete the local credentials file. Mac:
rm "~/Library/Application Support/elitedcs-ghl-mcp/credentials.json". Windows: delete%APPDATA%\elitedcs-ghl-mcp\credentials.json. - Remove the MCP from Claude. Claude Desktop: open
Settings → Developer → Edit Configand remove the"ghl"entry. Claude Code: runclaude mcp remove ghl.
If you also want to refund the purchase, email support@cliniclaunchlab.com within 14 days of purchase.